Fall of 2015, the Vettes Wiper’s decided just for fun they would turn over and Die
After doing the usual Shop Manual & Forums check’s I started digging into it.

Note My vette is not the typical Garage Queen that has 4 digits on the Odometer, This car is a Battle Axe, drive it till something breaks then fix it car with over 170K on the clock & a decade of Daily Driver Service.
Years of keeping the car under tree shade to keep it out of heavy sun exposure does have a counter effect, the bay where the Wind Shield wiper motor & Kinematics sit is a “World Class Mung Catching Black Hole” gunk gets in but does not want to come out.
1st item to note is buy the $30 wiper removal puller, the $10 is a total joke.
after removing the wiper nuts use trusty old PB Blaster to loosen things up

Close Up of the Passenger sides wiper

Wiper motor / Drivers side wiper

After un bolting the Wiper motor & Kinematics, a serious cleaning effort took place, the 3 circles in the wiper well hold the “udders” supposed 1 way “diodes” that let water out but not from the road up, unfortunately they collect Mung like nobody’s business.
But keep in mind this is likely the first time this has been done in 15 years.
Many Auto Repair Jobs you can combine things to get fixed or serviced to save effort / time.
The Oil Pressure Gauge has been dead for years in the car, Most things on the C5 are easy to reach / fix however the Oil Pressure sender was likely laid out on a Friday near the holidays at Generous Motors i.e. on the top 10, one of the worst Engineering decisions on the C5 Reading all the material out there, found 3 major ways to approach the problem:
1 take off the intake / fuel rails, a bunch of seals, grommets etc to access the sensor.
Pro’s:
- pure un bolt / re bolt, un clip / re clip with new seals,
- Good with the Nose in the air crowd
Con’s:
- Trade a not so serious oil pressure gauge read out issue for some serious FOD potential, leaky fuel connections, air leaks all on a 15 year old car covered in gravel road dust.
- Next time it brakes and from what I read it will break again, you get to re-pete this whole process.
Option 2, if the wipers are off, cut a hole in the fiberglass Wiper / fresh air intake “tub” for direct line of site access:
Pro’s:
- No FOD risk for the Fuel / Intake / leaks risk.
- direct line of site access / use a straight shot socket.
Con’s:
- Total Blasphemy with the Nose in the Air Crowd, however the High Odometer, faded paint I’m already in their time out box
- must carefully cut hole with a dremel in VERY light passes as to not cut the Left Bank Electrical Harness.
Option 3, remote mount oil Sender:
Pro’s:
- The Most easy access, lift hood, get to sender and swap
Con’s:
- Requires Option 1 or 2 to make happen
- more fittings / connections in the oil system for a catastrophic leak
- some kits fittings are very week
I originally planned on a Option 2 to get to Option 3 approach.
While processing tightening the fittings one of the AN adapters snapped right off, looking at the cross section there was a paper sliver thickness of Metal for wall thickness right where it snapped off. that was is it, no option 3 for me, went back to option 2.

Even though you cant even see the hole or patch when the wiper shield is back on even from under the car, the hole still needs to be covered, from the forum threads best I saw was a Black Duck Tape Patch, Being a Composites guy that seemed a little Cheesy of a fix, so time for some Fiberglass Surgery.


Fender & windshield near the area are protected from any e-poxy goopies

9 Ply 7725 [0º/45º]r layup with some System 3 Epoxy patch, picking up the exact contours of the tub, before the hole was cut using blue tape then duct tape as a release layer.

Popped off, trimmed and dry fitted patch

Hole was cut using a dremel with a #562 bit done in very light passes
Note the congregated Left Bank Electrical Harness, do not cut!
Oil Sender Harness can be seen in orange / yellow color
Use a 1-1/16 thin wall socket for access, impact socket walls are too thick and will stop short of engaging due to other features on the crank case
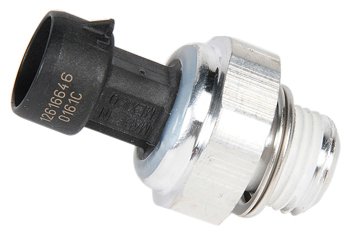
Bought a 12616646 / ASIN B0016HPUS8 from Amazon

Far away shot.

once swapped out and test run, the patch was bonded on with RTV, fiberglass was not sanded so the patch could be pried off for a future fix
The Sender is plug and play, got good reviews on Amazon and has worked fine so far.
For the Wiper Motor, I also got it from Amazon
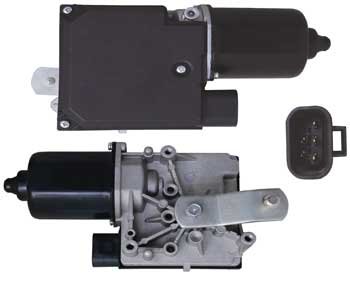
Note I did get This wiper motor to work but it took some messing around with to get it all done.

1st item needed is the hole with the tap in it (shown on the old motor) needs to be tapped on the new one to accept the shield plate that contains the Cam Park Stop feature.
I hand fit taps till I found one that fit right in, it was a “M4” metric

Close up of the tap

Arm compare, simple silver arm that came with the motor DO NOT USE, did this 1st try out and starting at the park position they stopped about 9″ short of full travel at the wiper tip, the Old arm does fit right on the New Motor saving the day.

Reference Shot showing the P/N info on the old motor.

New motor starting position, much thanks to the Digital Corvettes Forum Post
http://www.digitalcorvettes.com/forums/showthread.php?t=121213
For saving a ton of guess work in trying to calibrate the system, use the picture above of on the forum for the home park position, note the Cam is in fully disengaged position for the back travel proved by the motor.

Close up of the Arm & Cam,
I made a video of the correct action in the video below

While the Wiper Shield and Arms where off I gave them a fresh coat of paint, a vast improvement over the Chalk white before color.

Close up view

Beyond Fixing it my self and getting it all back together the most rewarding thing was seeing a GM Made in the USA stamp on the Wiper Tub, in a world of Made in China this simple thing is a nice change.

